Setting up AWS Cloudwatch Logs for On-Premise Servers.

23 | A sucker for strongly typed code. I tweet about Python, GraphQL & Typescript with the intent of making you a better developer. 日本語勉強中です
Introduction
Recently, I was assigned a task at my work, which required me to set up AWS Cloudwatch for three production-ready systems. Once complete, this would allow us to monitor them remotely and take timely action if something seemed fishy. But as I trying to figure out how to do it, I found that there were almost no resources tailored towards beginners. The AWS documentation is notorious for being extremely daunting for newcomers. This blog aims to simplify the process I went through and save you many hours of trial and error.
Background
This section is mostly for people who need to set up Cloudwatch for work but don't have the time to take up a full AWS course to understand it. Feel free to skip it if you're already familiar with it.
What is AWS Cloudwatch?
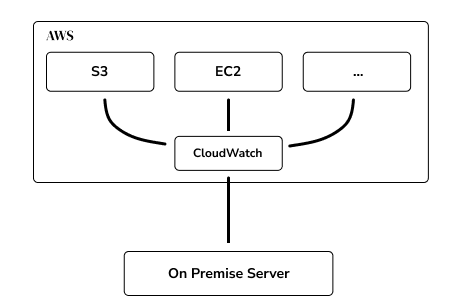
AWS Cloudwatch is a service that can be used to get an overview of data generated by your systems, across Cloud Computers (EC2 instances) and Local Machines (On-Premise Servers). It gives you an overview of how your systems are doing, the logs they generate, various metrics like CPU, RAM usages and even custom metrics like AI performance scores (covered in a later blog). This service becomes useful when you expect your software to be run in different environments to which you do not have regular on-site access.
For instance, consider a navigation software built for a mall, which runs on touch-enabled Kiosks on different floors. By setting up Cloudwatch on each of these machines, we would be able to track their status on the AWS Management console not only as regular log files but also with auto-generated dashboards that provide valuable summary information about the system activity over time.
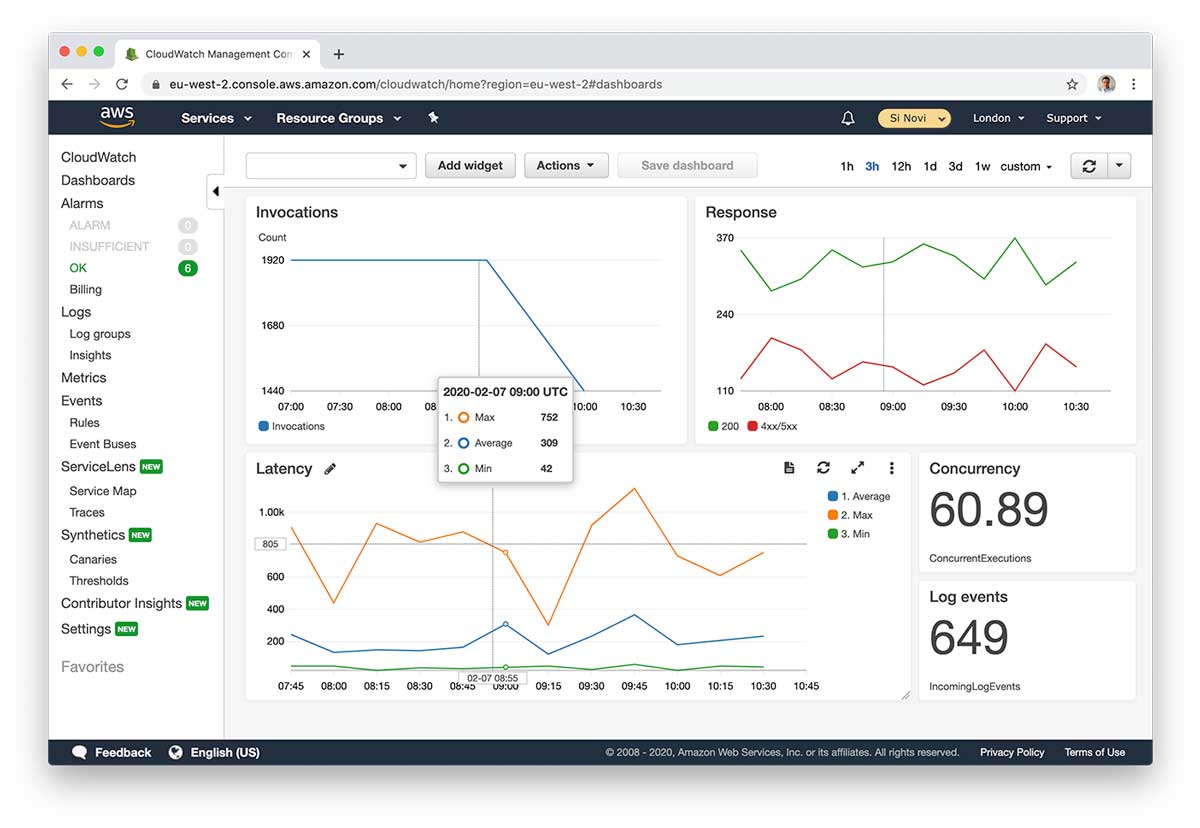
Sample Cloudwatch Dashboard
What are on-Premise Servers?
The main challenge I was assigned to solve for my task at work was to set up Cloudwatch logging for On-Premise Servers. Specifically, macOS on-premise servers.
What exactly does it mean?
From an AWS perspective, the environment in which your application runs can belong to two categories: an Amazon EC2 instance where all your processes are deployed within a cloud computer that's billed on a pay-as-you-use basis or a Hybrid Environment which can be a combination of local servers (aka on-premise servers) and virtual machines. For simplicity, you can think of on-premise servers as "machines that you or your customer already owns on which your software will be deployed".
Note: Currently, AWS only supports Linux, Windows and macOS operating systems as On-Premise Servers.
Connecting Clodwatch Logs to your System.
Depending on the type of environment your software runs on (hybrid environment or an ec2 instance), you have a couple of different options to set up cloudwatch logging.
Generally, setting up Cloudwatch for an EC2 instance is much simpler, since AWS pre-installs most of the things you need when you create your instance. For on-premises servers, however, we need to perform a few additional steps to get things working. Additionally, on all EC2 instances, you can make use of the interactive "Systems Manager" GUI to easily configure Cloudwatch.
Unfortunately, at the time of writing this article, we cannot use the Systems Manager GUI to set up Cloudwatch for on-premise macOS systems. This means that all setup and verification needs to be performed with the CLI.
Setup Steps
In this article, I present a step-by-step guide of CLI commands that you can use with very few modifications to set up on-premises logging for a macOS server.
1. Install the Cloudwatch Agent
The cloudwatch agent is a package that serves as a gateway between AWS and your system. It allows you to push logs and metrics to AWS Cloudwatch, Configure the files to be tracked, log groups and streams (explained later), define the custom metrics, set upload intervals etc.
On macOS, it can be installed on the terminal with the below commands:
wget  https://s3.amazonaws.com/amazoncloudwatch-agent/darwin/amd64/latest/amazon-cloudwatch-agent.pkg

sudo installer -pkg ./amazon-cloudwatch-agent.pkg -target /
The first command downloads the latest version of the agent and the second command will install it using the installer package native to macOS.
2. Create IAM User with the required permissions
Now that you have the cloudwatch agent installed locally, you need to create an IAM user, (IAM stands for Identity and Access Management and is a way for AWS to authenticate and authorise programmatic access to its cloud services.
2.1. Open the IAM Console
2.2. Click on Users on the left panel
2.3. Click on Add Users and Enter a user name of your choice
2.4. Check Progammatic Access and click Next:Permissions
2.5 Click on Attach existing policies directly
2.6. Check CloudWatchAgentServerPolicy from the search menu
2.7. Click Next:Tags, followed my Next:Review and finally Create User
2.8 Finally, save the Access key ID and Secret Access key in a secure location
A couple of quick notes about the steps given above:
- The documentation recommends using
AmazonCloudWatchAgentas the name for the User to simplify a couple of other steps in the set-up, but I did not find that it made a difference. - The Documentation also recommends adding Tags for making it easier to filter it in the future but is not necessary for the set-up.
- You can only view the Secret Key ONCE so do not lose it! (you can generate a new one in case you lose it, but it may be a pain to change it on the system)
3. Add user to AWS credentials
Now that you have created an IAM user with the required permissions, you need to add the access key and secret you generated in the previous step in the credentials file of your system.
cd ~/.aws
vim credentials

# save the following in the file

[AmazonCloudWatchAgent]
aws_access_key_id = <your-user-key-id>
aws_secret_access_key = <your-secret-access-key>
region = <aws-region>
Note: You need to replace the tags in the above with the real key, secret and regions of your system. For Region, I recommend choosing one that's closest to your physical location (ex. ap-south-1 for India). You may also need to replace AmazonCloudWatchAgent with the user name you set in step 2.
4. Update the Common Config
You now need to configure the agent to specify the name of the user profile you created and also the location of the credentials file
cd /opt/aws/amazon-cloudwatch-agent/etc
sudo vim common-config.toml

# save the following in the file
[credentials]
   shared_credential_profile = "AmazonCloudWatchAgent"
   shared_credential_file = "<absolute-path-to-home>/.aws/credentials"
Again, you may need to replace AmazonCloudWatchAgent
Important: The path to shared_credential_file needs to be the absolute path. I spent way too much time debugging this.
Note: The document states that this step can be skipped if we use AmazonCloudWatchAgent as the user name but I found that I needed to do this regardless, so I am including it here.
5. Create a CloudwatchAgent Config
Next, we need to create a config file for the agent that tells it what files to track, the time interval between pushing data to the cloud and other things mentioned in step 1.
For the sake of this tutorial, let's assume you have a single log file you would like to track at Users/home/cloudwatch-demo-project/logs.log
Create the file /Users/home/cloudwatch-demo-project/amazon-cloudwatch-agent.json and paste in the below info:
{
  "agent": {
    "metrics_collection_interval": 10,
    "logfile": "/opt/aws/amazon-cloudwatch-agent/logs/amazon-cloudwatch-agent.log"
  },
  "logs": {
    "logs_collected": {
      "files": {
        "collect_list": [
          {
            "There are a lot of options available to you and you can take a look [here](https://docs.aws.amazon.com/AmazonCloudWatch/latest/monitoring/CloudWatch-Agent-Configuration-File-Details.html) if you'd like to learn more.
": "/opt/aws/amazon-cloudwatch-agent/logs/amazon-cloudwatch-agent.log",
            "log_group_name": "group-name",
            "log_stream_name": "stream-name",
            "timezone": "Local"
          },
          {
            "file_path": "/Users/home/cloudwatch-demo-project/logs.log",
            "log_group_name": "group-name",
            "log_stream_name": "stream-name",
            "timezone": "Local"
          },
        ]
      }
    },
    "log_stream_name": "default-stream name",
    "force_flush_interval" : 15
  }
}
There are a lot of options available to you and you can take a look here if you'd like to learn about all of them.
A quick breakdown of the above JSON:
file_path: Name of the file to track and push to cloudwatchlog_group_name: Think of it as a "folder name" that contains the logslog_stream_name: Think of it as the name of the log file as stored on AWS. If not specified, thelog_stream_nameon the parent is used as default.force_flush_interval: Time in seconds to keep logs in memory before pushing them to AWS
6. Run the Agent
Finally, we are ready to run the cloudwatch agent and see our logs pushed to AWS.
sudo /opt/aws/amazon-cloudwatch-agent/bin/amazon-cloudwatch-agent-ctl -a fetch-config -m onPremise -s -c file:/Users/home/cloudwatch-demo-project/amazon-cloudwatch-agent.json
Note: You may need to replace the path for the JSON file with the actual path on your machine.
Monitoring And Management
Now that the cloudwatch agent is running, you can use the following commands to stop, check the status and logs while it is in operation.
Check agent status
sudo /opt/aws/amazon-cloudwatch-agent/bin/amazon-cloudwatch-agent-ctl -m ec2 -a status
Stop the agent
sudo /opt/aws/amazon-cloudwatch-agent/bin/amazon-cloudwatch-agent-ctl -m ec2 -a stop
Print Agent Logs
cat /opt/aws/amazon-cloudwatch-agent/logs/amazon-cloudwatch-agent.log
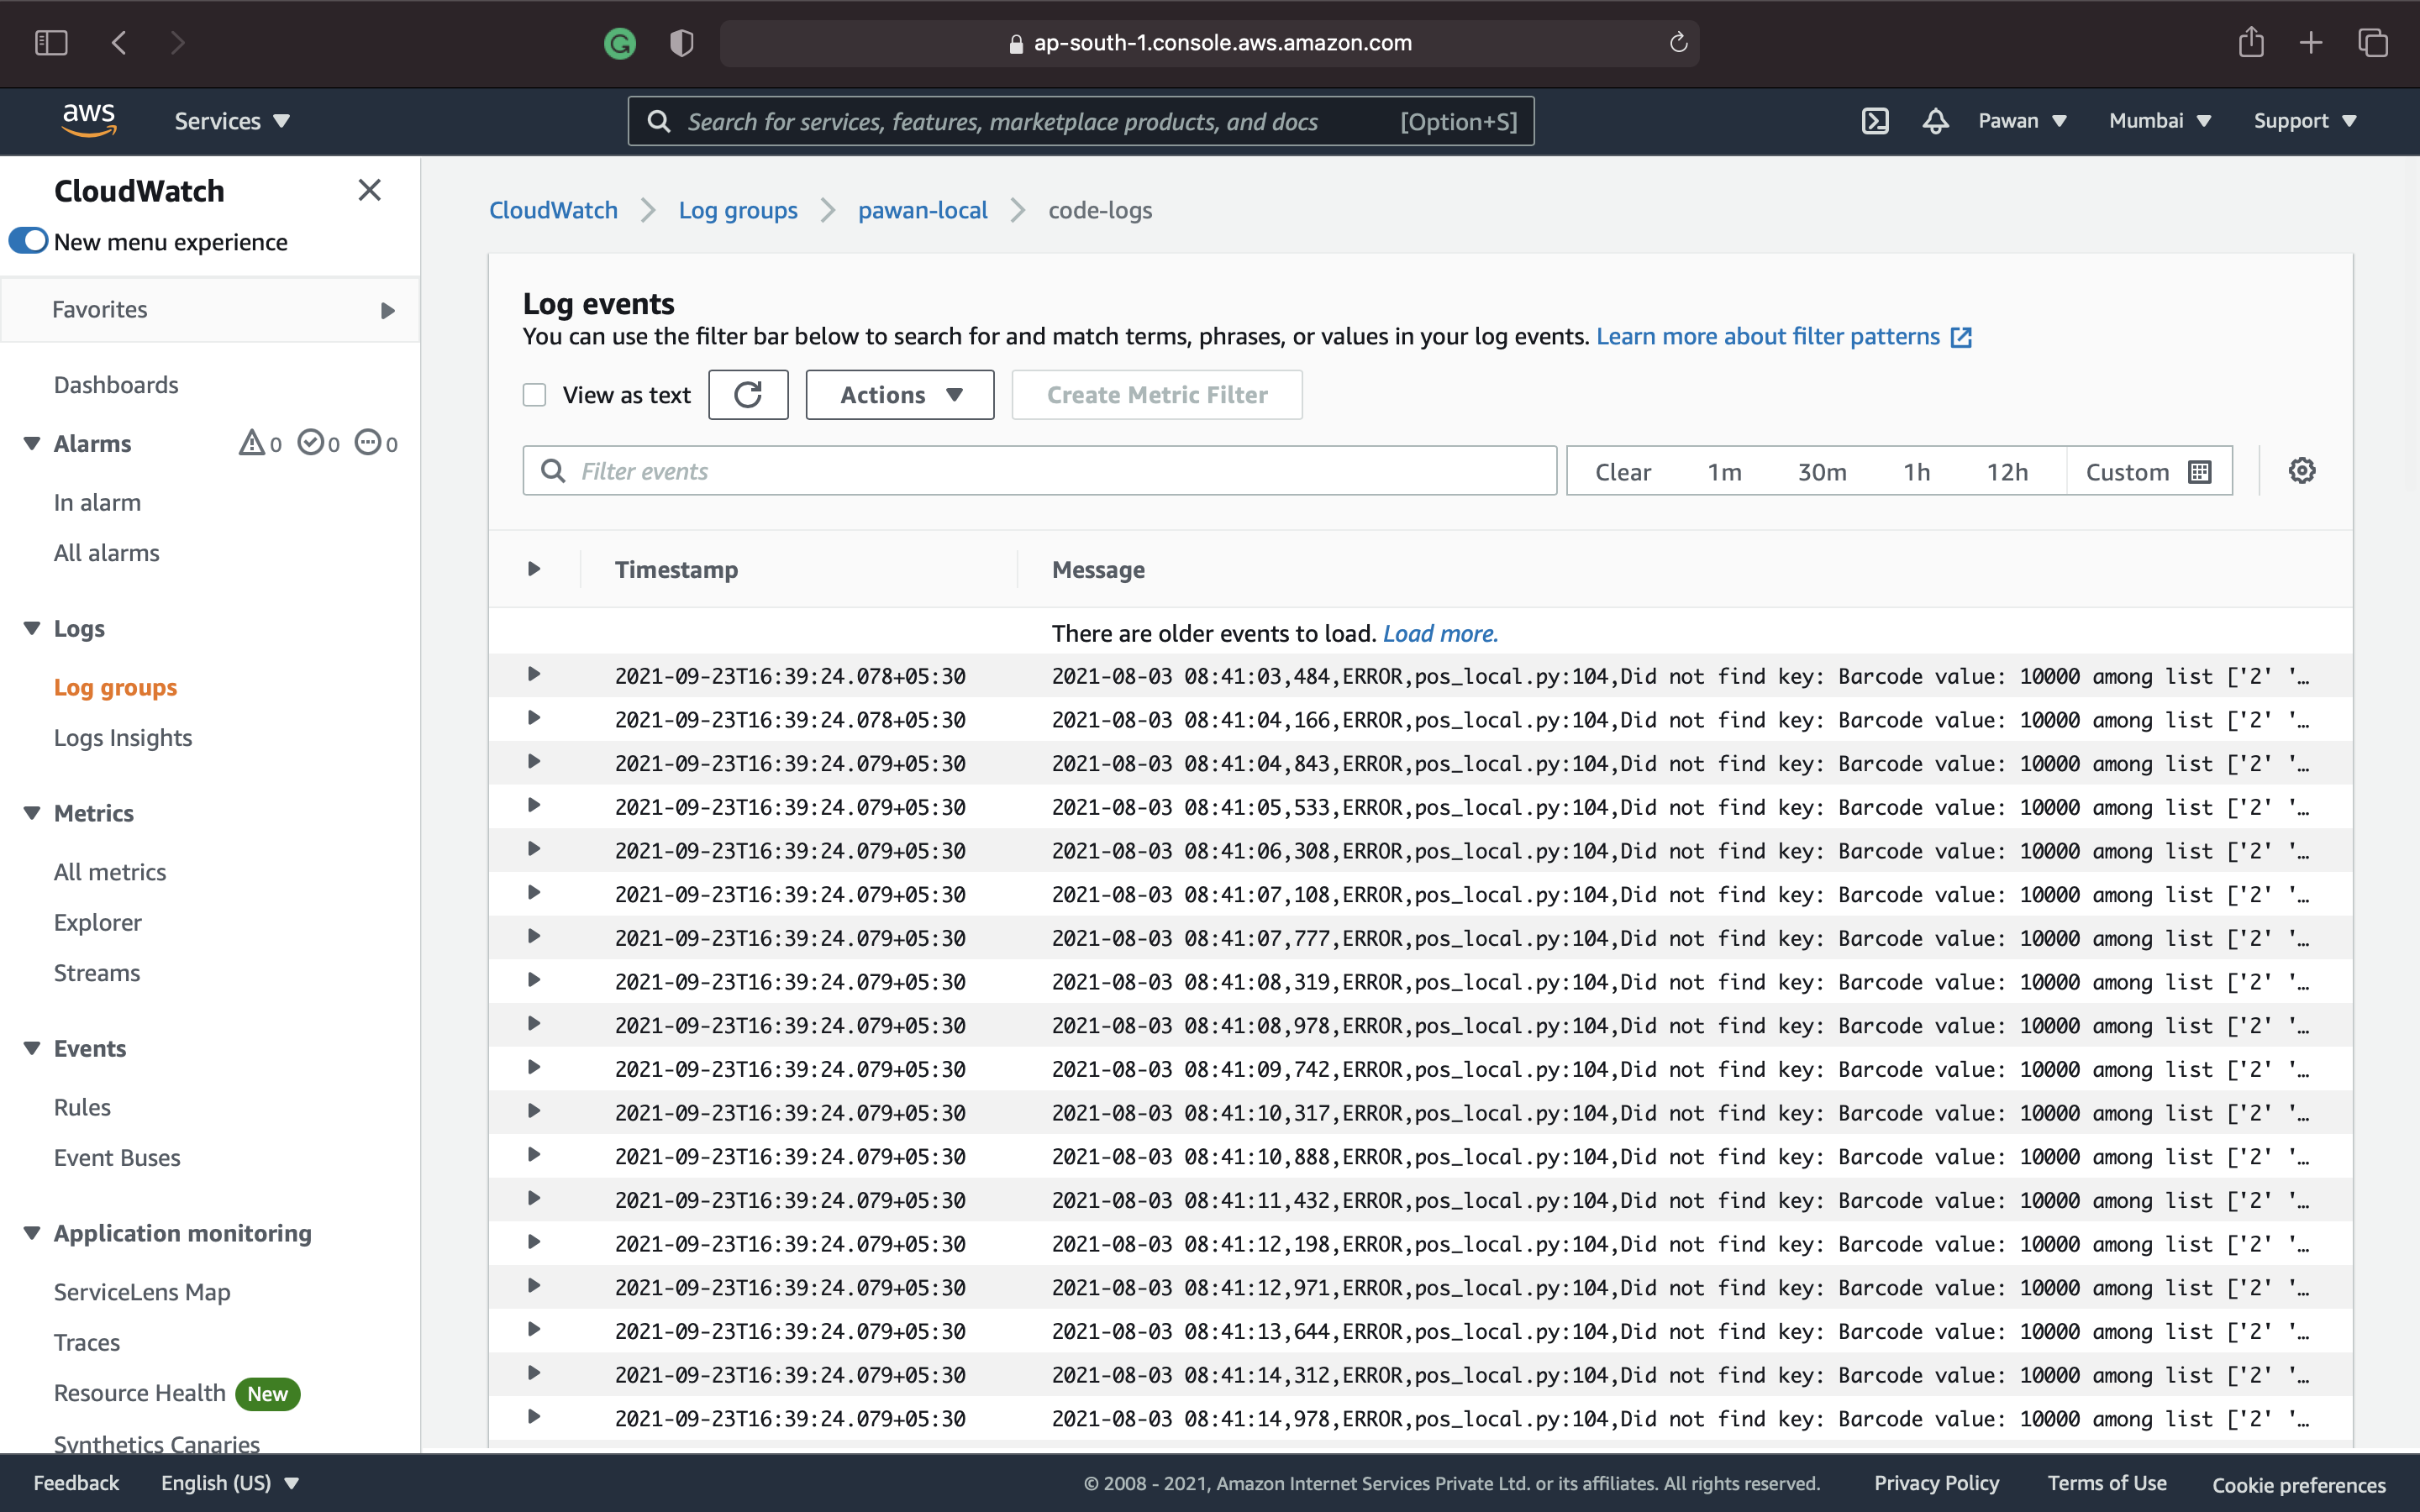
Verification
If everything went as expected, then you should be able to see your log groups and log streams on the AWS Console. The images below are what you can expect to see, provided you did not encounter any issues.

Possible Errors
This section documents a couple of issues I encountered when setting things up. These took hours to find and fix so hopefully, you don't have to.
Error 1
Unable to determine aws-region. Please make sure the credentials and region set correctly on your hosts. Refer to http://docs.aws.amazon.com/cli/latest/userguide/cli-chap-getting-started.html Fail to fetch the config!
This can mean that your region is missing in the credentials file but I almost always means that the secret and access ID are incorrect or do not belong to a user with the CloudWatchAgentServerPolicy attached. This error can be misleading!!
Error 2
Fail to fetch/remove JSON config: open /opt/aws/amazon-cloudwatch-agent/etc/amazon-cloudwatch-agent.json: no such file or directory

Fail to fetch the config!
This can happen when you store your config JSON file in the /opt/aws/amazon-cloudwatch-agent/etc/ directory. The reasons are unclear, but the agent sometimes deletes the file after launching it, causing a file not found error on a subsequent launch.
Final Thoughts
This article was created to complement the complete lack of non-documentation resources for helping beginners like myself quickly get up and running with AWS cloudwatch and also demystify some of the terminology used within the AWS ecosystem.
While my examples were mostly tailored for a macOS system, the same steps can be reproduced to make the agent work with any other operating system as well. You ONLY need to change the way in which you install the Agent in step 1 and all other steps should work as expected.
In case you have any issues with the guide presented in this article, feel free to contact me about it and I would be more than happy to help!
Happy coding!
